 close cropped")

My previous workshop was a converted garage. It was unheated, uninsulated, and riddled with hidey holes and cracks. The walls were lined with shelves overloaded with bolts of fabric, patterns, thread, sewing tools and baskets, sewing machines, books and boxes of finished and half finished projects. All of this added to the hodge-podge ambiance that I found useful to my creative process. It also played host to a whole ecology of insects, as well as the occasional mouse. As such, I found myself forced into close company with various spiders.
Spindly house spiders hung out in the window above my sewing table. Black, chitinous ones hid in the darkened corners. Jumping spiders, belying their name, were often found on the ceiling. On occasion one would even scuttle out from under the sewing machines giving me a start. As someone who is totally freaked out by spiders, this was not the most ideal work environment.
Despite my fear, I have work to do. I have spent more than a decade supporting my family with my sewing. So I forced myself each day to head into my workshop, spiders or no. Over those first few weeks in the workshop I learned what corners to avoid. I would give boxes a tap and jiggle before I moved them to allow any spiders the opportunity to skedaddle before I took it off the shelf. And I became less fearful.
The big, black spiders still creeped me out, but the long-legged, tan house spiders spinning webs in the windowsill didn’t bother me as much. They are delicate, almost ethereal creatures, and as far from threatening as I could imagine. I could recognize that they were just living their lives and keeping the bug population down. If I left them alone, they would extend the same courtesy to me.
As I worked, I was also exploring ways to bring my witchcraft practice into my work. I wanted to build a practice that was akin to kitchen witchery, but founded on sewing. As I worked at my machines, I played with various ideas: trying to adapt color correspondences to sewing, working out the magickal properties of fabric, etc. I would stop my work and gaze out the window while my thoughts swirled, trying to fit together.
And it was around this time that I made the connection between those spinning spiders and Arachne.
Depending on who is telling the tale, Arachne is the victim either of a jealous Athena or the realization that her own skills are no match for the goddess. Either way her fate is the same in all the tales: she is transformed into the first spider, and is inexorably linked with the woven arts for all eternity. As a woman who took up sewing to support my daughter after divorce, I could relate to Arachne’s story. There is always a feeling of having to prove oneself with each project taken on, with each stitch sewn. Granted, failure on my part won’t end up with me turned into a spider. The fact that she is not a deity in the strictest sense made her more relatable to me.
After a while I would find myself talking to Arachne through them. I’d complain about a particularly difficult bit of sewing. Or I would brag about a beautiful seam where the stitches were even and well-placed. Being a seamstress means a lot of hours working alone, so having someone to talk to, is nice sometimes. It was this relationship that helped inform and build my sew craft.
Like the strands of a web, I began to see how my work could be connected to my magickal intentions. Just like a kitchen witch would choose basil and garlic to add loving energies to their spaghetti sauce, I was paying more attention to colors, patterns and materials. If I were making items for sale I started using only pins with green heads. I started adding stitched runes to the inside hems of clothes for loved ones to give them added protection. I could mark runes on my sewing machine when I had a deadline to help me stay focused and to stave off doubts that I would finish in time. And each day I would look at Arachne, sitting and spinning in the windowsill, and know that I was weaving my own magick.
A year ago I left that workshop behind. My current one is set up in a finished basement. It is carpeted and heated. I have yet to see a single mouse (much to the disappointment of the house cats). The spiders, however, are here. Chitinous, jumping, and spindly, they all live in new places. The windows of my workspace are high above and let in little light and no view worth staring at. Even so, Arachne has found places to settle, most often from the underside of the shelves.
My working relationship with Arachne has led to me writing a book of sewing magick, Sew Witchy, and continues to this day. I walk downstairs, say good morning and ask, “What are we going to work on today?” The answer is always, “Something magickal.”
The soft fabric tray outlined below is a perfect introduction to including magick in your sewing. It is a simple craft, requiring no complicated pattern or sewing techniques. It can be easily resized to whatever dimensions suit your needs. And you end up with a useful item.
It takes about an hour to put together. If you can, set a time to sew it during the waxing moon to tap into the energies of growth and change, especially if you’ll be using this to hold your runes or tarot cards. Pick fabric prints that tie into your intended use for the tray. For example use prints that feature crystal balls, tarot cards and other mystical images for a tray meant to hold your oracle tools. If the tray will be used to hold special jewelry or scents, pick a fabric that is printed with hearts (for self love), pentagrams (for confidence in your magick), or symbols related to deities you work with (to enhance your connection). You can work color magick into your tray through your choice of fabric and thread as well.
While cotton is recommended for this project, it is suitable for a variety of fabrics. You’ll be fusing your fabric to the interfacing which will require an iron with a steam setting. If you choose a delicate or synthetic fabric you might want to use a press cloth–simply a piece of muslin that is placed between the iron and the fabric to prevent scorching or melting. Consult the owners manual of your iron to find out which setting to use when pressing. Heavy fabrics like velvet, denim or canvas may need extra pressing and to have their seams trimmed close to stitching to reduce bulk.
The craft interfacing used in this project is a thick material that gives the tray structure. The type called for is doubled sided fusible, meaning that it has a layer on each side that melts and fuses with fabric when it comes into contact with heat. You want to make sure you have the double sided type, so that both the top and the bottom of the tray fuses to the interfacing. It is available from most hobby shops and online.
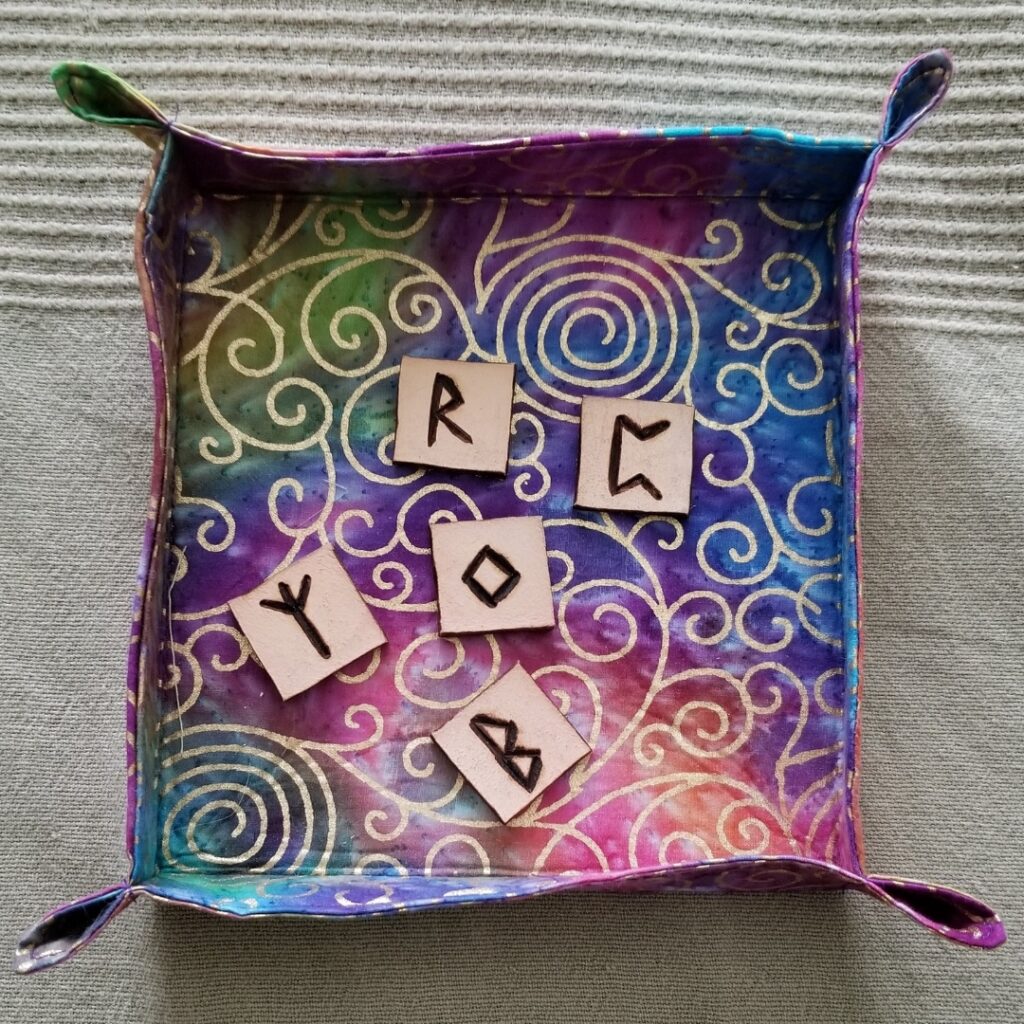
The rune tray can be used in a variety of ways. Use it to hold your runes or tarot deck when you aren’t using them. When you are using your runes you can lay them out on the tray in the same way you would lay them out on a cloth, table or altar. You can ditch the rune association altogether, even, and use the tray on your altar to hold herbs, crystals, and other items.
Rune Tray
Materials
- 2 9” x 9” squares of fabric
- 1 7 ⅞” x 7 ⅞” piece of double-side fusible craft interfacing
- Thread
- Sewing Machine + Regular & Heavy Duty Needles
- Quilting pen or pencil
- Steam Iron
Instructions
- Cut a 1” square from each corner of the interfacing.
- With right sides together, sew a 1/2″ seam around all four sides of the fabric, leaving a 3″ gap for turning. Use a needle in your machine that is appropriate for the fabric.
- Clip the corners and trim the seams.
- Turn the fabric right side out. Use a skewer or chopstick to push out the corners. Press with an iron.
- Fold the interfacing into thirds and insert it into the 3” opening. Unroll the interfacing inside of the fabric so that it flattens.
- Press, using steam, to fuse the interfacing to the fabric on both sides.
- Sew 1/8″ around all the edges of the tray. Use a heavy duty needle in your machine so that it will go through all layers.
- Mark the interior stitching marks by drawing lines 1 ¾” from the edge of each side with the quilt marking pencil or pen. The lines will meet up forming a square in the middle. Stitch this interior square.
- If you are using a quilting pen that requires heat to fade the lines, press the tray.
- To sew the corners bring two perpendicular sides together so that it makes a triangle. Sew a line 1” from the point of the triangle through all layers. Sew back and forth over this line a couple of times to reinforce the seam. Repeat with the other three corners.
- If you wish, press your tray along the interior lines to give the folds a crisp finish.
Resizing Instructions
This tray is easy to customize. Decide how large you want the interior of the tray to be. Then decide how deep you want the walls of the tray to be. Add the wall measurement to the interior measurement. Finally, add 1” for the seam allowance (giving you a ½” seam allowance on each side).. For instance, if you want a tray that has an interior of 4” and 1” deep walls you’ll want to cut two fabric pieces that are 6” x 6”. (4” + 1” + 1” = 6”)
For the inside craft interfacing you’ll cut a square that is 1 ⅛” smaller than your fabric squares. This takes into account the 1” lost to the seam allowances. The extra ⅛” allows the interfacing to fit without strain and creating wonky edges on your tray. Using the example above, the interfacing for the 4” tray would be a 4 ⅞” square.
Cut our squares on each corner to match the depth of the walls. Again, using the example above, you would cut out 1” squares on each corner of the interfacing for the corner seams.
Sew your customized tray as per the instructions above.
This article first appeared in Llewellyn’s 2021 Witches’ Companion.
Raechel Henderson is a witch, pagan and author. Her books are: Sew Witchy, and The Scent of Lemon & Rosemary.